
Here's a tutorial to make the white doily flower on this card.
( see my previous post.)

( see my previous post.)
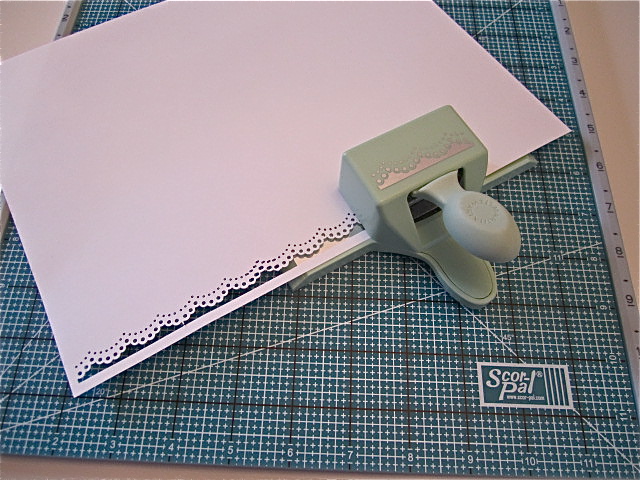
Step 1) With punch of your choice, punch along the edge of your paper, mine is 11" long.

Step 2) Line up to approx. 1" on your trimmer and cut a strip.
(Make it narrower for a smaller flower or wider if you want a bigger flower)

Step 3) On your score board, score every 1/4 inch - being careful not to cut the paper. (as I did in a couple of spots - oops!)

Step 4) Now fold accordian style as shown above.

Step 5) Join each end together using a glue dot.

Step 6) Now put a dollop (yes it's a word) of hot glue in the centre....about the size of a quarter.

Step 7) Now squish the flower down in the middle and hold for a few seconds until glue is dry. (as you can see, mine came up through the centre, I think it's because my glue wasn't quite as hot as it should be, but that's fine)

Step 8) When dry I use my Cricut spatula to loosen from the mat.

The back

Step 9) Now choose a nice bead or button for the centre and you're done!
You could also ink the edges before you score & fold, make a smaller one and add it on the top, use different punches for different effects.
There's lots of different ways of making these flowers, or medallions as they are also called. My tutorial is based on one that I found on Youtube.
Thanks for visiting today.

5 comments :
Pretty! I love your rosette with the huge "bling" in the middle!
Beautiful card and flower and great tutorial too! Thanks for sharing it with us!
Love your doily flower tutorial, gorgeous!
Its beautiful, Babs! Thanks for the tutorial!
So pretty babs! Love the whole card! The layers of your rosette is beautiful! I have made some very similar but I love the idea of the hot glue. That is always the trick of getting it to cooperate in the end!
Post a Comment