Monday, August 29, 2011

Back to School!


Anyone out there remember the St. Trinians movies?  Now I'm really giving my age away, but I used to love watching them when I was a ki.......hmmm, I mean younger. lol
This girl reminded me so much of the St. Trinians school girls....but cuter!  Sorry. but I don't remember where I found her.  I used my Copics to colour her, then paper pieced her hat, hair & tie. The sentiment is made on my computer with a chalk font. I tried to match her uniform to my papers.


I am entering this card in the *Back to School* challenge at Allsorts  and also at Creative Stamp Friends

Thanks to all for dropping in,


Sunday, August 28, 2011

Too Cute ~ again!

I decided to add a sentiment and the stars to my card, as I mentioned yesterday, I felt that it needed something but nothing I tried looked right.  Anyway, I did this today and now I like it better. 
The sentiment was made on my computer.
There's a tutorial for the paper bow on yesterdays post.


Some Challenges:
Digital Tuesday ~ *Cute & Girly*
Cuddly Buddly ~ *Say Something Nice*
Digis With Attitude ~ *Anything Goes*
Paper Crafting Journey ~ *Anything Goes*


Thanks for looking & have a good day,


Saturday, August 27, 2011

Too Cute!


I saw this little cutie digi stamp at Prairie Fairy Designs and just loved it.  I paper pieced her dress, arms, shoes, hair, glasses and soother, then I gave her sparkly earrings.  I kept adding different things to the card, flowers, stars, etc., thinking it needed something more, but I didn't think they made it look better so I left it as is.  I decided to add a paper bow instead of ribbon to this one. Further down is my version of a tutorial to show you how I made it.


Paper Bow Tutorial


Cut a length of card stock 8.5" long and as wide as you like, mine is  half an inch wide. This will give you a bow that is just under 3.5" long.

Fold in half

Fold as shown above


On the back join with a small piece of tape (notice that the 2 ends are a little longer than the middle part)

Now cut out a semi circle piece from the centre, do this on each side as shown

Cut out a small piece of cardstock that is long enough to wrap around the middle and overlap on the back. I inked the edges with distress ink to give it some definition.

Now wrap the small band around the centre and attach at the back with a glue dot.


Cut a small triangle out of each end as shown and ink with distress ink.


This is what I did for the card above, you need to cut out some of the c/s in the middle so that it doesn't show under the bow. Now glue the bow onto the flat piece and puff it up a bit with your fingers.


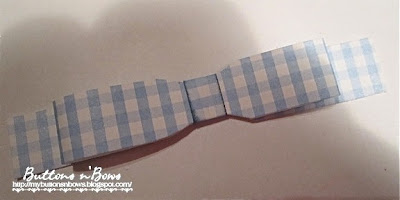
The finished bow

I haven't done many tutorials, so hope my explanations and pictures are easy to follow.

Thanks for visiting my blog, have a good night all!


*Love* Easel Card

Hi everyone,
First of all, does anyone know where my background went?
This is the second time it has disappeared and I have no idea why, things are just not the same without it. :-(
 I suppose it will come back again one of these days!!!

Now onto my newest card.... 


 I used my Martha Stewart punches for the border, leaves & butterfly's.  The papers are digital backgrounds that I have saved on my computer & printed off.  I mounted them onto black cardstock and stitched around the edges. The small flowers are punched out, the largest is a *Recollections* mulberry paper rose.  *Love* is also a digi that I printed out, backed with card stock and added some tiny black gems.


That's it for today,  
I'll be back soon...in the meantime, if anyone sees my background floating around blogland, can you please send it home. (see, I'm really losing it now ;-))

Bye for now,


Wednesday, August 24, 2011

WOYWW

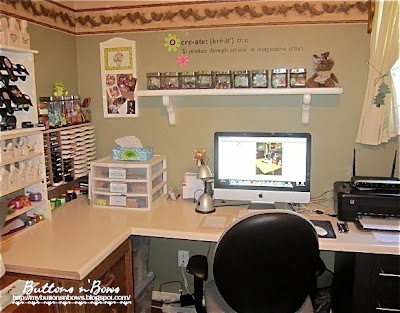
Today instead of just showing you what's on my work desk, I 
thought I'd show you my craft room.  Lots of pics coming up ~~~


My stamp pads shelf

My hubby made this shelf as well as the punch shelves below.


This cupboard holds all my rubber stamps.  I use old vhs tape boxes to store some of them.  On the top shelf is the blue binder that holds my acrylic stamps, 4 of my 5 Cricut cartridges, a box of beads and another box of rubber stamps.  My Cinch binder is on the third shelf along with a few other tools.

Dorcas' blog is on my computer.

Here is my work desk, it's an 8' long portable table from Costco.  I love it because it's big enough to be able to keep my tools out all the time such as my trimmer, scorpal and cuttlebug.  My Cricut is on the little table at the back, I don't use it very often, but probably wouldn't use it at all if it was put away.

Here's a card I'm working on.

And last, but not least. the little creatures that inhabit my craft room....


Hope I haven't bored you too much. 
Thanks for stopping by & have a lovely evening!


Tuesday, August 23, 2011

You're "Moo"~velous!


I came across a tutorial for making this ribbon flower, so then I had to make a card to use it on.  Here's a closer look at it...


I've had the cute cow digi for a long time, so can't remember where I got her....sorry.  The little bit of colouring is with my Copics, then popped up on dimensionals.  The *grass* is just cut with scissors. I made the sentiment on my computer using a cow spots font, layered it and popped it up also.  Easy peasy!


Challenges: Aud's ~ anything goes

Moo~chas gracias for dropping in today.
(couldn't resist) 


Sunday, August 21, 2011

Pink ~ Green ~ Navy


Hello everybody, I have another card to show you.  I made this one for the colour challenge at  *The Play Date Cafe*

Here's the colours they want us to use....very nice combo.


 A couple more pictures.....


The papers are DCWV except for the pink swirly one, don't know who's that one is. This flower is one that I made quite a while back & found in my stash today. The sentiment is from TLC Creations (link is on the right)

Thats all for now, I'm sick today, so after I've added this to the challenge I'm going to have a nice cuppa tea and put my feet up.


 Thanks a bunch for stopping by.


Related Posts Plugin for WordPress, Blogger...