Tuesday, March 12, 2013

25th Anniversary Celebration

On Saturday the 9th of March we celebrated the silver wedding anniversary of my daughter and son in law with a champagne brunch held at the local golf course.
The brunch was my son's idea, and what a good idea it was!
Here are a few pictures of some of the decorations etc.
Sorry, but not all the pictures are great quality, I used my iphone, which I'm not used to, and some of them are quite blurry.

First, the chalkboard Welcome Sign


This is my 3rd attempt at doing this sign.  I love these chalkboard signs, they are very trendy right now.
I found some chalkboard fonts and did my best to copy them, using painters tape and sometimes a ruler to keep everything straight (or close to it)
 I also found a black chalkboard background, and with a program I use, "Memory Mixer" I added the letters in one of the fonts I found, then printed it off and cut out each banner.  I then backed each one with white card stock and attached them together with glue dots.  When it was done, I sprayed it lightly with hairspray which made a big difference, it took a lot of the chalk dust off and made everything look sharper. Helps to keep the chalk from smudging too. The hairspray comes right off with soap and water.

Some of the flowers...


Tall candelabra in the centre of the family style table arrangement.


Favours 
(Ferrero Roche chocs inside)

*Lemon Pomegranate* Cupcakes They were yummy!
(I didn't get a picture of all of them on the display stand. duh!)


Some of the Decorations
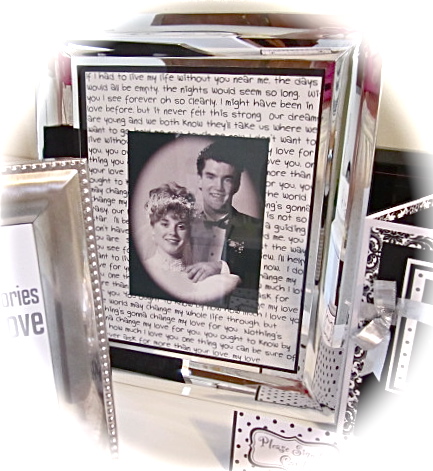

Wedding Song Frame
Here their wedding song "Nothing's Gonna Change My Love For You"
is the background for their wedding picture.  Cute idea!


A "Wordle" frame that I made on the website "Wordle"

Love these.  Usually they are made with a shadow box so that the spoons are behind the glass.  I couldn't find one in time, so my spoons are on top of the glass. I used designer paper and the matt as a background, then cut out the words with black vinyl on my Cricut. The spoons are attached with hot glue.


I had already made them an album, (here) so instead of doing a guest book I thought that I would make a card for the guests to sign.  It's black on the inside and they signed with a white gel pen.

Place cards


The Guest Book Table below
The banner says "Congratulations!" but it doesn't show on here. It was supposed to go across the front of the table, but was too long, so we compromised. 

Enjoy a Cupcake
Chalkboard sign on table with cupcakes
That's all for now, hope you have a great day.


Saturday, January 26, 2013

Faux Chalk Card

Yesterday a friend came over and we both made a card. I think it's a fairly new technique that is meant to look like chalk on a blackboard.  
Here's my card...

I took these pictures when it was quite dark and didn't feel like setting up my Ott light etc., so they are not the best, also the colour looks a bit brown, it is black & white though.


Here you can see the inside, ready for me to write my message.

The steps for this technique are as follows:

1)  First, rub your embossing buddy over your black card stock, this will prevent your embossing powder from sticking where you don't want it and give you a nice clean image. 

2) Stamp your first image with Versamark, then sprinkle  with white embossing powder, continue to stamp each of your images, sprinkling with embossing powder after each one....this is so that they don't dry out.

2)   Emboss your images using your heat gun.

3)  Next, using the same stamps and white ink, stamp again over the original image, but this time, go just a little to the right of your first stamp, so that it looks like there is a shadow.  You can see this in the 2nd picture if you look closely.  It doesn't have to be perfect, it's supposed to look like chalk.

4)  Take a piece of paper towel or cloth, and rub a little white ink around the edges.  I did this but it's hard to see on the picture.

5)  Now if you want to, you can add some lines or doodling with a white gel pen.

It's done....now you can make your card.

If you are more of a visual learner & prefer to watch how it is done, click here for the video tutorial.

Thanks for stopping by, have a nice evening.


Thursday, January 24, 2013

25th Anniversary Card

Another *shadow box card* to show you today.
I made this for my daughter & son in law for their 25th anniversary. Wow, can it really be that long?


I used traditional silver along with black & white.


I ended up using different flowers inside the box, but forget to take a picture of it, duh!
The *word cloud* on the left is made on a website named Wordle, this is pretty popular right now and it's free.....cool eh?


That's all for today, I appreciate your visit.

Luv, Babs


Wednesday, January 23, 2013

*Star Book*

Hi everyone, so nice of you to drop by.
Today I have something new to show you....it's new for me anyway.
It is a star book that I made for my daughter and her hubby for their 25th wedding anniversary.


The papers I used are DCWV *LA CREME* matstack.  It is one of their premium paper stacks and is just beautiful.  The colours are black, cream, a darker cream and a little brown.....some have flocking.


This is why it is called a *star* book.

I used my Cricut cartridges a lot for this one.  The ones I used most are *Serenade* - *Storybook* - *Sophisticated* and *Lacy Labels*
You don't want your embellishments to be too thick, so other than using pop dots on a couple of items, I kept everything flat.
I'm pretty happy with how this turned out, and will be making another one for sure.  If you would like to give it a try check out the very detailed tutorial I found on Expert Village  There are about 6 short videos, each dealing with one of the steps involved.

Have a lovely day, bye for now....


Saturday, January 19, 2013

Vintage Shadow Box Book Card

FINALLY!!!
I have found the time to do some scrappin' and I have a card to share with you.  I also did a tutorial at the end of this post.

For anyone that is not familiar with this style of card, it is known as a *Shadow Box Book* card.

Here's the front

This is the side view with the spine facing

 The inside
I'm not too keen on the 'hello there' part, I'll be re-doing that.

A closer look at the inside of the box

Another view of the front.


It looks like it's a difficult card to make, but it's really not (although putting the *pages* together can be a little tricky.  I have made a
tutorial - so here goes!

Shadow Box Card Tutorial (6" x 4")

The Box (pages).....

Cut 2 - 4" x 11" pieces of card stock
Cut 2 - 6" x 11" pieces of card stock

Score each piece at 1/2" intervals across the longest edge

Fold each of the 4 pieces using mountain - valley fold (accordion)


The card.....
Cut 1 - 6" x 10" piece of card stock
Score at 4.25" & 5.75"


Fold both ends inward & set aside for now.

Back to the pages.....

Put a little dab of glue on each fold as shown.  I use Alenes Tacky Glue, it sticks well, but gives you a little time to move things around. 

Now for the tricky bit.... join a 4" piece to a 6" piece as shown here and below.


Now push each piece into place until they are quite snug.  Hold for a few seconds. Mine isn't perfect, but I kept pushing both ways and it ended up being nice & tight.

Continue with each piece until you have this.

Now back to the card part.....

Now it's time to decorate. 
Add designer paper to the left and right sides as well as the front.

This is where your box will go.  You may want to decorate the part that will be inside the box first before you stick the box down.  I used double sided tape to stick mine down.

Hope this has been helpful to you.
Have a great day!


Tuesday, December 25, 2012

Our Little Cutie Pie!


Thought it was time to share some more pictures of our Grandson Knox.
He's growing like a weed and even has 2 teeth.


Now here's a couple that were taken by a professional - my son, Andrew.


Just look at that hair....he's soooo precious!


Knox with his mommy & daddy.

That's all for now, I should have a card to post soon.


Related Posts Plugin for WordPress, Blogger...